Bake Along #107 – Naked Cake – Sour Cream Cake with Sour Cream Buttercream
March 3, 2020 2021-09-04 18:49Bake Along #107 – Naked Cake – Sour Cream Cake with Sour Cream Buttercream
Bake Along #107 – Naked Cake – Sour Cream Cake with Sour Cream Buttercream
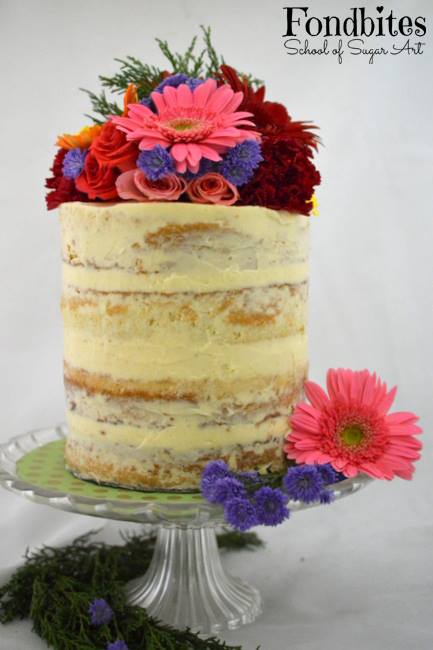
Everything about the year 2019 was amazing and I was only learning new things all year through. And so I really wanted to do something new to begin with and Naked Cakes are something I haven’t tried my hands at.
But what about the recipe that goes into the making of the cake and the cream. I wanted that to be new and fresh too. Sour cream vanilla cake with french sour cream buttercream. I have made sour cream cakes earlier but I was carried away by how this recipes works. It is a completely engineered recipe and this may start becoming your ‘to- go’ recipe going forward.
The cake has both butter and oil. It has both baking powder and baking soda. A lot of sour cream to moisten up. The method is reverse creaming and I somehow love everything about this method.
And the beautiful thing about the buttercream is, it is based on a fool proof swiss meringue buttercream. And the fact that so much sour cream is incorporated into buttercream, I was in awe when everything came together. This method of making buttercream was totally new to me and I really didn’t believe I will have that fluffy buttercream with me at the end.
I have replaced the sour cream from the original recipe to fresh cream and vinegar.
We will be building the cake with 4 sponges and I have explained how to dowel and give stability to tall cakes.
Ingredients:-
Recipe source: Cake Paper Party
Cake:
- All-purporse flour – 400 gms
- Cornflour – 30 gms
- Baking powder – 2 teaspoons
- Baking soda – 1/4 teaspoon
- Salt – 1 teaspoon
- Granulated white sugar – 510 gms
- Eggs – 5 Large
- Fresh dairy cream – 330 gms
- Vinegar – 10 gms
- Vanilla extract – 1 tablespoon
- Unsalted butter – 227 gms, soft
- Vegetable oil – 150 ml
Buttercream:
- Unsalted butter – 140 gms ( Name this Butter1)
- Granulated sugar – 200 gms ( Name this Sugar1)
- Fresh dairy cream – 130 gms
- Vinegar – 10 gm
- Corn syrup – 2 tablespoons
- Baking soda – 1/2 teaspoon
- Eggs – 280 gms ( Almost 6 eggs)
- Granulated white sugar – 255 gms ( Name this Sugar2)
- Unsalted butter – 454 gms ( Name this Butter2)
- Vanilla extract – 2 tablespoons
Method:
Cake:
1. Pre-heat oven to 160 degree C. Line up four 7 inch cake pans with butter paper and butter the same.
2. Add the eggs in a bowl, beat using a wire whisk until the eggs are combined well.
3. Add fresh cream, vinegar and vanilla extract and whisk well until combined.
4. Add all-purpose flour, cornflour, baking powder, baking soda, salt and sugar in the bowl of your electric beater. Start to beat on slow speed for 1 minute until the ingredients are combined well.
5. Add the butter and beat on medium speed until combined well for about a minute.
6. Pour oil slowly while still beating. Start to beat on medium high speed for about 1 minute until the dry ingredients have moistened up well.
7. Add half of the egg-sour cream mixture and beat on medium high speed for 3 full minutes. This is where the batter is aerated in the reverse creaming method.
8. Add the remaining eggs-sour cream mixture into the batter and beat on medium high speed for 2 more minutes until the batter builds its structure completely.
That is the final batter and I usually get a high, every time I have a finished cake batter. Do you get it too ?!
9. Equally divide the batter between the 4 pans. Bake in pre-heated oven for 50 minutes at 160 degree C, until the cakes are golden brown on the top, and the sides of the cake are released from the sides of the pan, and a tooth pick inserted into the center of the cake comes out clean. This is a totally moist cake and if you have under baked the cakes, then it will be very unstable. So baking it completely is essential.
10. Cool the cakes on wire rack. If you would not be assembling the cake the same day, you need to cling wrap the cakes in 2 layers and freeze them until you are ready to frost.
Buttercream –
1. Add butter1, sugar1, fresh cream, vinegar and corn syrup in a heavy bottomed sauce pan. Bring it on stove top on medium flame.
2. Keep mixing until the butter melts and everything combines together and starts to boil.
3. It will start bubbling up, reduce flame to medium low and keep boiling it for 3 more minutes.
4. After exactly 3 minutes, switch off the stove and add baking soda into the buttercream sauce.
5. Mix well. It will foam and bubble up.
6. Add the eggs in a bowl that could be used for double boiling. Whisk well until combined.
7. Add sugar2 and whisk again to combine well.
8. Bring the eggs-sugar mixture on a double boiler. Keep whisking until the mixture is hot to the touch.
10. Keep double boiling for 2 more minutes until the mixture is again hot to the touch. Remove from double boiler.
11. Transfer the sauce into a wider vessel and refrigerate for 2 to 4 hours or freeze it for 30 minutes. I chose the latter.
12. It will still be a saucy liquid even after refrigeration/chilling.
13. Add butter2 into the bowl of your electric beater. Beat on medium high speed for 2 to 3 minutes until the butter becomes fluffy and light.
14. Pour half of the butter sauce into the fluffy butter and beat on slow speed for 30 seconds first. Then increase the speed to medium high and beat for 2 minutes until the mixture becomes fluffy.
15. Add the remaining sauce completely and start to beat again on slow speed until the liquid is combined well first. Then increase the speed to medium and keep beating for 2 more minutes until you have a fluffy unbelievable sour cream butter cream.
Assembly –
1. Place a cake board and then some buttercream on the cake board for the cake to stick and then place the first cake. Add about a cup of buttercream on top of the cake and then spread it with an offset spatula until even on top.
2. Place the next cake and then again add a cup of buttercream and smooth it out using offset spatula.
3. Tall cakes have to be handled differently to have stability. That needs doweling. Insert a dowel through both the cakes and then mark the top of the cake in the dowel. Remove the dowel from the cake.
4. Cut the dowel at the marking and then cut 3 more dowels, each of them should be exactly the same height.
5. Insert the 4 dowels into the cake.
6. Place a cake board which has a hole in the middle for the center dowel to go through.
7. Spread some more buttercream on top of the board and then place the 3rd cake on top. Add another cup of buttercream and spread it out even.
8. Place the final layer of the cake. Use a metal scrapper or the spatula to smooth out the sides of the buttercream filling.
9. I wanted to keep the sides of the cake moist, if kept completely open, it may dry out the cake. I spread some buttercream on the sides of the cake too.
10. I used the spatula and roughly smoothed out and also made sure the cake is not completely covered with the cream, yet I didn’t want to leave any dry part of the cake exposed. Spread out some buttercream on top of the cake and even out. Now its time to insert the center dowel. Measure and cut the dowel to a length that is just shorter than the height of the cake.
11. Insert the dowel in the center of the cake completely. It needs to pass through the hole of the board in the middle.
12. The dowel should have completely gone inside of the cake.
13. Spread out some buttercream on top to cover the hole and smooth out.
14. Wash out all the flowers needed to be placed on the cake. Dry them out on a clean towel. Chop of the excess stems and leaves. Start arranging them as much as you would like them on top and sides. I would love to move the cake from the working board to another presentation board that is covered with a decorative paper.
Tall cakes need the doweling for stability, without which they will collapse during transit. So when you cut this cake you will have a slice with the top 2 layers and then you finish cutting up the top 2 layers first. Remove the board in the middle and then remove all the 4 dowels first and then start serving the bottom 2 layers. If you are giving away the cake to someone else, you need to inform them about the dowel and how they have to handle the cake while cutting.